I am a little framework averse.
When I write a program, I like to build from scratch as far as it is practical. Not using a framework gives me the feeling that I am so in control of my own destiny. But having said that, I will sometimes succumb to using a framework when it's very clear that the use of the framework will result in
- significantly less code, and/or
- significantly less complexity
I recently rewrote a text-based user interface using Backbone, and as far as I know, that is a framework. This is story of how that all went down.
The Problem
I was working on the user interface for Testem - a test runner for Javascripts written in Node. The UI looks like this (press "Play")
The most interesting aspect of the UI is the tabbed interface. Each tab represents a browser, which may currently be running tests inside of it. It displays the name and version of that browser, and a test result summary - the number of tests passed vs the number of tests ran in total. The test summary updates in real-time as the test results are coming in from the browsers, and there is a little spinner widget next to the summary while the tests are being run. The panel just below the tabs is a text panel that shows any failed tests and their associated error messages or just a message saying that all tests have been passing or passed if that is the case.
Here are some of the events the tab interface will have to handle
- when a new browser connects, add and render a new tab
- when a browser disconnects, remove its tab - potentially having to update the location of the tabs that come after the removed tab
- when a browser sends in a new test result, update the tab display to reflect it
- If the user changes the window size of the terminal, re-layout and re-render the entire app
- On each tab for which the browser is currently running tests, display an animated spinner, stop the spinner when the test suite has finished
- when the user switch tabs using the arrow keys, update the display to represent the current tab's display, and also update the text panel's text to the text out point of the new current browser's text display
In short, the UI is very event driven.
The "Before"
First, I will get you acquainted with a piece of the code before the rewrite has taken place. But before that you'll need just a little background on a library called Charm.
Charm
The text-based UI was written using Substack's excellent Charm library. In the old days, to code a terminal-based UI, you would use the curses library. There is a curses binding for Node, which I did use initially for this project, but the problems with using curses are the long compile time - which kills the user install experience, and the non-support for Windows. Charm is a dream because 1) it's just a couple hundred lines of Javascipt, 2) it works on Windows, and 3) it works great.
About 90% percent of the things I am going to do with Charm consists of two simple steps.
- positioning the cursor at a specified position in the terminal using
charm.position(col, row) - write out some text at the cursor using
charm.write(str)
And that's it! There're other methods like to change the text color or display attributes, but those will be straightforward to follow along.
Moving On
At this point, I had one method responsible for rendering each general section of the UI, which are illustrated below
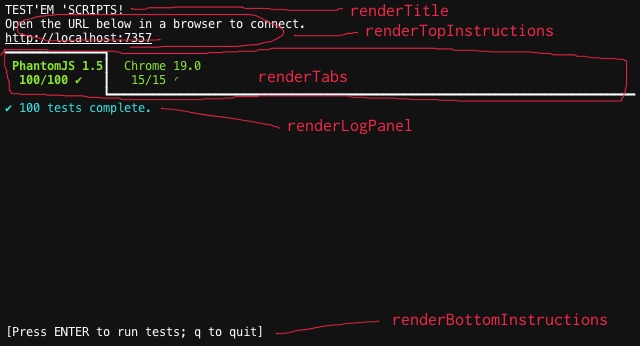
These methods are also responsible for updating the part of the view they take up, so most of them take the approach of either clearing the canvas first and then render, or simply to pad spaces up to the end of the terminal for the empty areas so that any old text within them will get overwritten. Let's dive into the code a little bit, here are some code snippets from renderTabs()
this.blankOutLine(4)
this.blankOutLine(5)
this.blankOutLine(6)
this code blanks out lines 4, 5, and 6 in the terminal - the lines which the tabs occupy on the screen - to get rid of any text that might have been there before. The implementation of blankOutLine() is simple
...
blankOutLine: function(line){
    charm.position(0, line)
    charm.write(Array(this.cols + 1).join(' '))
},
...
Basically, blankOutLine moves to the beginning of said line, and blanks it out by writing out the exactly number of spaces that span the width of the terminal.
Then on the line just below those 3 blanked lines, it draws a horizontal line compositing of the character ━ across the entire screen - this is to draw the tab line for all the tabs that are deselected.
charm.position(1, 7)
charm.write(Array(this.cols).join(Chars.horizontal))
We now have a horizontal line, but no tabs. To actually make tabs, it iterates through the array of browsers and draws a tab for each of them
browsers.forEach(function(browser, idx){
    // render tab content for this browser
    ...
})
With this loop, the code to draw the tab starts by calculating from what column in the terminal we should start drawing for this particular tab, based on the index, which we are calling idx
    var colWidth = this.colWidth()
      , startCol = colWidth * idx + 1
The first thing to render is the browser name - which will be written on line 5. It also sets the color to the color we want - red for failed, green for passing, and then also setting the display setting to bright for the selected tab, and then finally, writes out the browser name to the screen while padding the string to the full width of the tab - I am using this pad function
    charm.position(startCol, 5)
    var color = this.colorForTab(browser)
    if (color) charm.foreground(color)
    if (selected) charm.display('bright')

    // write browser name
    var str = pad(browser.name || '', this.colWidth(), ' ', 2)
    charm.write(str)
The next thing to render are the test result summary. That and a little spinner widget when the tests are running - which is informed by !browser.results.all (the "all" stands for "all results are in").
    if (browser.results)
        str = browser.results.passed + '/' + browser.results.total
    else
        str = 'N/A'
    if (!browser.results.all){
        var spinnerIdx = browser.spinnerIdx
        str = '  ' + str + ' ' + this.spinnerChars[spinnerIdx++]
        if (spinnerIdx >= this.spinnerChars.length){
            spinnerIdx = 0
        }
        browser.spinnerIdx = spinnerIdx
    }else{
        str = '  ' + str + ' ' + (
            browser.results.failed > 0 ? Chars.fail : Chars.success)
    }
    charm.position(this.colWidth() * idx + 1, 6)
    charm.write(pad(str, this.colWidth(), ' ', 2))
Don't worry if you don't understand everything that's going on, just following the general gist is good enough.
Lastly there is one more step - drawing a border for the selected tab using box drawing unicode characters. That part I'll leave to your imagination, but it's basically more of the same: positioning the cursor at the right places and writing out the characters.
This is a very simplistic way to render the tabs. I am a proponent of do the simplest thing that could possibly work - and this worked. There was a problem though: because all the tabs are drawn at the same time, all of the tabs get redrawn everytime any of the browser test results changed, so it's a bit inefficient. On top of that, because 1) on every update the background is cleared before redrawing, and 2) the test results come in very frequently when the tests are running, this resulted in flickering - the kind that's unwanted. This is when I decided to rewrite this UI rendering code using the MVC architecture.
Why MVC?
MVC(Model-View-Controller) is a great fit for this problem because of the eventful nature of this UI - there are many different types of event occuring in the UI, and each different event type could cause a different part of the UI to update. For example
- When new test results come in from a browser, it should need to update the test result summary on that browser's tab, but nothing else
- When the user switches tabs from one browser to another using the arrow keys, it should need to update the display of the newly selected tab to look like the selected tab, and revert the display of the previously selected tab to look deselected, but it needn't update the actual contents of those tabs
MVC is a pattern that allows you to handle fine grained update rules like these in a straightforward manner.
Models and Views
First let's start with the models and the views. Models are the domain objects in the problem space - in our problem, that would be the browsers and their associated test results. Views are the visual representations of the models, and usually this is a 1-to-1 mapping: one view for representing one model. The view is responsible for drawing the part of the UI that represents its model, and while doing this it will ask the model for information that it needs.
But, the big idea in MVC is that the view listens for changes on its model, so when the information in the model changes, it will notify its view via a change event - which will in turn update the display to reflect correctly the new state of the model.
In our example, the browsers and their associated test results are the models. When new browsers are added, or when test results for a browser changes, the associated UI views must update to reflect the changes.
C for Controller
The other kind of event is external events - such as user input via the keyboard, browsers connecting and disconnecting, and more (we actualy made an extensive list of these earlier). Some of these events may result in updates to the model objects, which would in turn trigger UI display updates. The job of the controller is to handle these events do it in a sane way. Usually, this is just a bunch of logic that takes the form of: when event X happens, do Y. Often times this logic is just written in an ad-hoc manner, other times they are written inside the views, still other times, they are separated out into a separate module.
Enter Backbone.js
It seems a lot of people are in love with Backbone. I am a bit indifferent - like I said, I am framework averse. Nevertheless, I decided to give it a go because
- everyone is talking about it and I feel left out - it's the same thing you'd feel if you missed the movie that everyone is talking about
- it is lightweight, and does everything that I need. Although I could do MVC from scratch, the result probably won't have any palpable advantage vs using Backbone
The "After"
So, I set out to build this using Backbone. The first thing to do was to use Backbone's models to rewrite my models - which used to be plain ol` Javascript objects.
My Models
When you inherit your own model objects from Backbone.Model, your objects will gain the ability of automatically notify other interested objects whenever its attributes change.
I have two central model objects
BrowserClient- which represents a browser that's connected to TestemTestResults- which belongs to theBrowserClientand represents the current tests results associated to aBrowserClient.
In Backbone, you make a subclass of Backbone.Model by calling Backbone.Model.extend(), like so
var BrowserClient = Backbone.Model.extend({
    initialize: function(attrs){
        this.set({
             name: null
             , results: new TestResults
        })
    }
})
We've added an initialize method which in Backbone is the initialiser - it gets called when an instance is created initially. In there, we simply instantiate a couple of properties: name and results. Notice that we use the set method of Backbone.Model to set attributes rather than setting them directly on the object as properties, this is what allows Backbone to do its thing. To see it in action, you can create an instance of BrowserClient and then register a property change listener by listening on the event change:name
var browserClient = new BrowserClient
browserClient.on('change:name', function(){
    console.log('You changed the name to ' + browserClient.get('name'))
})
At this point the callback function will be called anytime the name attribute of browserClient is changed.
Similarly, we have a second model called TestResults, which has the attributes passed, failed, total, among others
var TestResults = Backbone.Model.extend({
     initialize: function(){
          this.set({
               passed: 0
               , failed: 0
               , total: 0
          })
     }
})
My Views
The UI in Testem is composed of several different components, so I broken them down to different view objects.
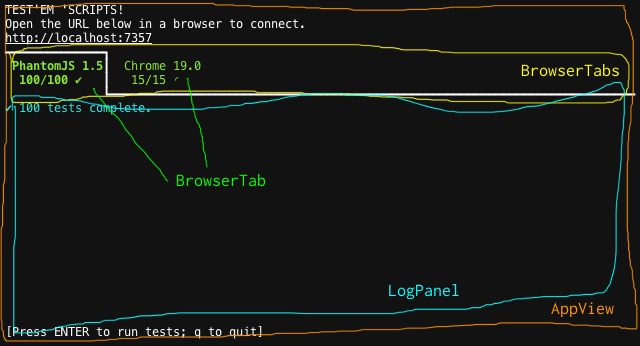
The AppView is the top level view of the entire UI, handles drawing the title and instructions at the top and the bottom help instructions, and then it delegates the stuff in the middle to the BrowserTabs view object. BrowserTabs is responsible for drawing all the tabs (including the log panels within them), but delegates the drawing of each individual tab to a BrowserTab - BrowserTabs inherits from Backbone.Collection, which is nice because it automatically notifies listeners when an item is added or removed.
Traditional Backbone apps - if I can call them that - make use of Backbone's base view class Backbone.View. I cannot use Backbone.View because it is designed to work with the DOM, and I don't have a DOM. So, instead I've created my own base View class which all of my UI views inherit from.
For the next code examples I will focus on the views that handle rendering the browser tabs. I made two classes: BrowserTabs - which is a Backbone.Collection but also acts as a composite view of all the tabs and BrowserTab which handles the rendering of a single tab.
Backbone.Collection
Backbone.Collection deserves some explanation: it is a special kind of model that contains a collection of models. Functionally it acts more or less like an array, but in addition, it gives you automatic notification to its listeners when new items are inserted to or removed from the collection, as the example below demonstrates
var myCollection = new Backbone.Collection
myCollection.on('add', function(newItem){
    console.log('You added a new test result!')
    console.log(newItem)
})
myCollection.add(new TestResult)
BrowserTab
The BrowserTab is the view that is responsible for rendering a single browser tab, but it is also responsible for handling the various events that requires it to update the display of the tab, so the controller logic is embedded inside the view. Some maybe say this is not pure MVC, and that's okay - I am not big on purity.
var BrowserTab = View.extend({
    initialize: function(attributes){
        var self = this
        var browser = this.browser = attributes.browser
        browser.on('change:name', function(){
             self.renderBrowserName()
        })
    },
    ...
    renderBrowserName: function(){
        ...
})
The above is a glimpse into how BrowserTab works. There is a renderBrowserName method which renders just the browser name on the tab. To ensure the name is always up-to-date, BrowserTab registers a listener on the change:name event so that it re-renders the browser name every time it is changed.
What's that? You want to see the implementation of renderBrowserName? (Sigh)...Okay...
renderBrowserName: function(){
    var index = this.get('index')
      , col = this.col + index * width
    ...
    charm
        .position(col + 1, line + 1)
        .write(pad(browserName || '', width - 2, ' ', 2))
        .display('reset')
}
I've simplify the code down to the essiential. The BrowserTab object has an index attribute which corresponds to its position in the list of tabs, starting with 0 for the leftest tab. Keeping this index attribute up-to-date is the job of BrowserTabs. Based on this index, BrowserTab knows how to calculate the starting column col from where to draw itself.
Let's keep going. The next thing that needs to be rendered on the tab is the test result summary plus a little spinner widget on the same line. The following methods are of interest
renderResults- renders the second line of the tab header, which includes the test summary and the spinner widgetstartSpinner- starts spinning the spinnerstopSpinner- stops the spinner
For this case, because there's some animation going on, in order to keep the animation smooth I need to re-render the text at regular intervals instead of simply updating whenever the test results change. So we go to our trusty setTimeout. startSpinner looks like this
...
startSpinner: function(){
    // stop the spinner just in case it's still running
    this.stopSpinner()
    var self = this
    // "Async Loop" pattern to repeatedly call the `renderResults` method every 150ms
    function render(){
        self.renderResults()
        self.setTimeoutID = setTimeout(render, 150)
    }
    // Kick off the loop
    render()
}
...
The main part of this method is the async loop that calls renderResults every 150ms. renderResults knows to rotate through 4 different spinner characters so that the user see a spinner effect. stopSpinner is simply clearing the last timeout ID.
...
stopSpinner: function(){
    if (this.setTimeoutID) clearTimeout(this.setTimeoutID)
}
...
When do startSpinner and stopSpinner get called? Well, see this code
var BrowserTab = View.extend({
    initialize: function(attributes){
        var self = this
        var browser = this.browser = attributes.browser
        ...
        browser.on('tests-start', function(){
            self.startSpinner()
        })
        browser.get('results').on('change:all', function(){
            self.stopSpinner()
            self.renderResults()
        })
    },
    ...
})
The BrowserClient object actually emits a custom event tests-start when the tests start running. So, we setup a listener on that event and call startSpinner in response. For stopping, I know that the results object's all attribute gets changed to true when all test results have come in, so I can register to listen for the change:all event of the TestResults object.
More on My Base View Class
I mentioned earlier that I wrote my own base View class - I want to go into that a little bit too because there are a couple of key insights in there.
Stateful Views
The first insight is that for rich UIs, view objects are stateful. Think about the widgets you might find in typical rich UIs: scrollable panels have state - the scroll offset, tabbed panels have state - the selected tab index. These are state that decidedly belong to the view - it wouldn't make sense to store the scroll offset, for example, in the model for most applications. For this reason, my View extends Backbone.Model - giving it the ability to notify others of its state changes. Examples of view state in my app are the current tab index of the browser tabs; the scroll offset in the log message panel; and the dimension of the terminal - which can be changed by the user by resizing his terminal window.
When you have stateful views, some call them view-models, and then they may say the architecture is MVVM (Model-View-View-Model) rather than MVC. This is fine, I am not too concerned about what to call things, especially since MVC is such an overloaded term, but I do believe that in general rich UIs have stateful views.
Event Handler Cleanup Helper
There are occassions when you have to destroy view objects - usually when you are deleting the view's corresponding model. Destroying views is tedious because you have to take care to remove all of the listeners that it has registered on its model, and anything else. The way I refactored away this tedium is by adding a couple of helper methods on the base View class: observe and removeObservers. I am sure almost every other developer using Backbone has done more or less the same. Here's an example of observe in action
this.observe(results, {
    'change': function(){
        var results = self.browser.get('results')
          , passed = results.get('passed')
          , total = results.get('total')
          , allPassed = passed === total
          , topLevelError = results.get('topLevelError')
        self.set('allPassed', allPassed && !topLevelError)
    }
    , 'change:all': function(){
        self.stopSpinner()
        self.renderResults()
    }
})
This will add event listeners on results for the events change and change:all. All listeners registered using observe are removed when removeObservers is called.
Here's the full source code for my View class
var View = exports.View = Backbone.Model.extend({
    charm: charm
    , observe: function(model, thing){
        var eventMap
        if (typeof thing === 'string' && arguments.length === 3){
            eventMap = {}
            eventMap[thing] = arguments[2]
        }else{
            eventMap = thing
        }
        for (var event in eventMap){
            model.on(event, eventMap[event])
        }
        if (!this.observers)
            this.observers = []
        this.observers.push([model, eventMap])
    }
    , destroy: function(){
        this.removeObservers()
    }
    , removeObservers: function(){
        if (!this.observers) return
        this.observers.forEach(function(observer){
            var model = observer[0]
              , eventMap = observer[1]
            for (var event in eventMap){
                model.off(event, eventMap[event])
            }
        })
    }
})
Computed Attributes
A computed attribute of an object is a synthetic attribute that is computed from a combination of other existing attributes. Backbone does not support this out of the box, so I use a poor man's way of doing this - by manually updating the "computed attribute" whenever the dependent attributes change. For example
this.observe(results, {
    'change': function(){
        var results = self.browser.get('results')
          , passed = results.get('passed')
          , total = results.get('total')
          , allPassed = passed === total
          , topLevelError = results.get('topLevelError')
        self.set('allPassed', allPassed && !topLevelError)
    }
    ...
})
This code listens for any changes in the results object, and then computes its own allPassed attribute - based on several attributes of results. The allPassed attribute mainly informs whether to render the tab in red or green
...
, color: function(){
    return this.get('allPassed') ? 'green' : 'red'
}
...
Then later on, I can have a listener on change:allPassed which re-renders a part of the screen, which will render it in the correct color
this.observe(this, {
    ...
    , 'change:allPassed': function(){
        self.renderBrowserName()
        self.renderResults()
    }
})
More Code
That's all the code examples that's fit to print. But if you just can't get enough, you can always see the full source code because Testem is an open source project. Check out appview.js, browserclient.js, and the project's github page itself. If you want to see the code before the refactor, see the prebackbone branch.
Was It Worth It?
Rewriting this UI had four main benefits
- it fixed the pressing issue of flickering. Could it have been fixed without this rewrite? Yes, but we have 3 more benefits...
- keeping the UI display up-to-date is now done much more efficiently because it only updates the parts that are outdated at a fine grain level
- the code now has better structure. Methods are smaller and grouped into a handful of classes. The objects are more decoupled - meaning that changes in one part of the application is less likely to break or affect something in another part - thus making the project itself easier to work with overall
- I know Backbone!!!
So, yes. I am quite happy with the rewrite. Of course, as usual, you can ask questions in the comments.